Showing posts with label Recipes. Show all posts

Thursday, April 17, 2014

Easter Hopping Bunnies Sweet Buns and Resurrection Buns

We had some fun today, made Hopping Bunnies and Resurrection Buns.  I have been very slack in my photo taking for, well, the past year and a half?  So this is what we've got.

So often we try to steer away from all the "sugar junk" that inevitably comes along with holidays, but whenever we have cut it out completely, there is always a feeling of "no celebration".  So...

Let the children get creative!


Anxiously awaiting the timer and a fresh hopping bunny!

YUM!

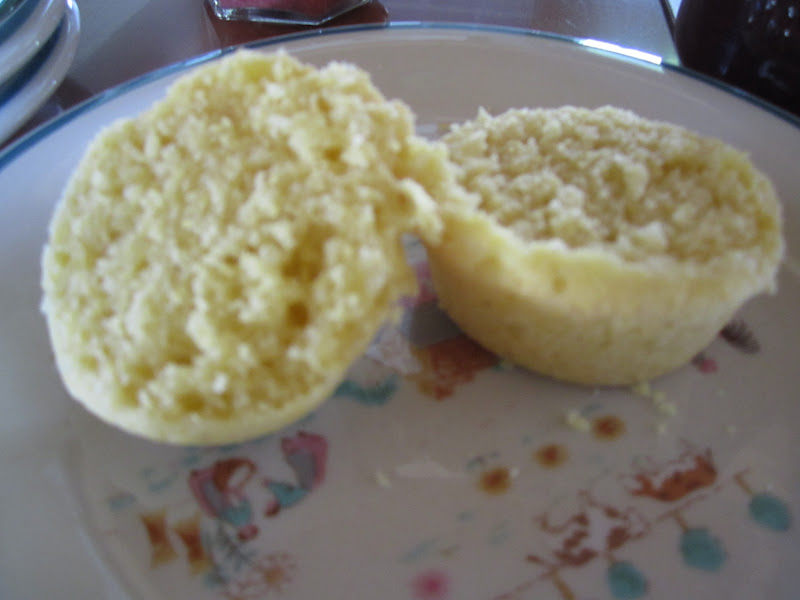
Resurrection buns...easy to make and have a great surprise inside!


Braids, Bunnies, Mickey Mouse, Kitty Cat, and something that looks like a snail?
 Hopping Bunnies Sweet Dough Recipe

1 Cup Scalded Milk                                1/4 Cup Orange Juice
1 Cup Warm Water                                 2 Tbsp. Grated Orange Peel
1/3 Cup Sugar                                         5 to 6 cups White Flour
1/2 Cup Shortening
1 Tsp. Salt                                              GLAZE:   2 Cups Icing Sugar
2 Eggs                                                                      1 Tsp. Butter
1 Tbsp. Yeast                                                           1/4 Cup Hot Water

Scald milk with shortening.
Mix Yeast with 2 cups flour.
Add Milk with shortening, water, sugar, salt, eggs, orange juice and peel.
Add in enough flour to make a non-sticky dough.   ( I used my Bosch and did a double batch easily)
Let rise until Doubled.
Divide dough in half.  Roll into rectangles approx. 15 inches long.
Cut strips about 1/2 inch wide.  Roll or twist into ropes and then either do a FIGURE 8 shape and add a round tail OR Twist into a round spiral, then into a smaller round spiral for the head.  Add ears and a tail.  OR DO WHATEVER!
Let rise again, but watch to make sure they are not getting all wonky looking.  We did a double batch, and by the time the last ones were okay to go in, they still looked good.    Just keep baking as you design the rest.  You can also make triangles and roll them into Butterhorn or Crescent shapes.
Bake at 375 for 12-15 minutes.   Brush with glaze while still warm,
OR make a butter cream or cream cheese frosting to put on them.

Resurrection Buns

Take a square of dough (or Pillsbury Dough Boy brand).  Get a Large Marshmallow. (Jesus)  Roll this in oil (like anointing of Jesus, etc)  Put in the centre of your dough.  Roll it up and seal it well.  Let rise and bake.
When it's baked, cut it down the middle ~ SURPRISE ~ Where did Jesus go?  He rose from the dead, the tomb is empty!  All that is left is the sweet promise of salvation and all that Jesus gives us!

Now as you know, we have some GLUTEN FREE folks in our family, so we're not going to leave them out!  Tomorrow we will make the Gluten Free Paska recipe from the Mennonite Girls Can Cook Cookbook click HERE for RECIPE
I'll let you know how they turn out!

Monday, January 13, 2014

An Olive Garden Salad Recipe

When I lived in the big city of Winnipeg, my roomies and I would sometimes treat ourselves to a meal out at the Olive Gardens.  With FREE breadsticks and refillable salad or soup, we had it made!

In all honesty, I like to eat salad, but I really really really dislike making it.  I don't know why, "it's a struggle" for me!  haha.

So after I saw my cousin's 3 year old chowing down on some Peperoncini Peppers, I thought "I must eat Olive Gardens salad!"

After searching the wonderful internet I found this recipe and it is serving me well.  The photos are not great and my daughters say "I don't like when people take photos of food", but I need somewhere to keep this recipe so I won't forget it.

Olive Garden Salad and Dressing Recipe

Mixed greens (of your choice)  I used Red Leaf and Green Leaf and Iceberg lettuce
Red Onion
Tomato
Peperoncini Peppers (Unico has the canned ones)
Black Olives
Parmesan Cheese

Mix the above for your salad part, some use croutons, some don't.

Olive Garden style Salad Dressing

1/2 cup Mayo
1/4 cup white vinegar
1 tsp olive oil (or of your choice)
2 tbsp corn syrup (I want to try some honey next time)
2 tbsp parmesan cheese
2 tbsp romano cheese ( I didn't have, so I just added more parmesan)
1 clove garlic, minced
1/2 tsp Italian Seasoning blend
1/2 tsp parsley
1 tbsp lemon juice
sugar (optional)

Mix all together, and keep in a container in the fridge.  We used ours up within 10 days.

Friday, December 13, 2013

Ginger Jam Jams AKA Ginger Bread Cookies

I will upload a photo when I can, but here is the recipe I use for Ginger Bread Men.  It is really a Ginger Jam Jams recipe, but the flavor is so nice, we like them better than most really crunchy ones.

Ginger Jam Jams AKA Ginger Bread Men Recipe

1 cup Butter
1 cup White Sugar
1/2 cup Molasses
1/2 cup Syrup
1 tsp Baking Soda
1/2 cup Hot Water
1 tsp Ginger  ( I usually add cinnamon as well, but this is the original recipe)
1 tsp Salt
2 tsp Vanilla
6 cups (approx) Flour

Cream butter and sugar.
Add molasses and syrup.
Dissolve baking soda in water and add.
Mix dry ingredients together in separate bowl and slowly add to dough.  Add enough flour to make a rollable dough.
Make into your favorite shapes.  Small cookies take less time to bake.
BAKE 350 for 10-12 minutes.

You can also let cool, then spread with raspberry or strawberry jam and make them into a sandwich cookie.

This is a LARGE BATCH.  Feel free to half it.

Friday, September 13, 2013

Canned Apple Pie Filling, Tomato Soup, and Dilled Carrots

I am finally squirreling away some food for winter!  This is very exciting, as it means my back injury is healing and I am finally feeling up to it.  Can't understand how poorly I was feeling, but I am still on my target for 2013's garden ~ $450 worth of vegetables into my home!  I am now sitting around the $375 mark.

Homemade Apple Pie Filling
 These apples actually came from our old yard in Oak Lake ~ how sweet it was to meet the new owners and be given some of the plums and apples that we had all come to love.  They are now made into Apple Pie filling and we've been eating the rest just fresh!

Canned Apple Pie Filling

7 quarts chopped up apples (in salt water or lemon juice to keep fresh)
4 1/2 cups sugar ( I did 2 cups of brown, rest white)
1 cup cornstarch
1/4 tsp nutmeg
2 tsp cinnamon
1 tsp salt
3 tbsp lemon juice
10 1/2 cups water

Cook syrup.
Pack apples into hot sterilized jars with a 1/2 inch head space ( Don't over fill, or they boil over and can't seal)
Pour hot syrup into apple jars, wipe rims, put the lids on.
Hot water bath for 15 to 20 minutes.

I am generous with my spices and added some cloves as well.  Adjust to taste.  This makes a great Apple Crisp as well as pie.  One of my jars was too full, so it didn't seal ~ so we had apple crisp!  I love some opps!


Homemade Canned Tomato Soup
This is my first time canning Tomato Soup, but with a wheat allergy in the household, Campbells soup is out for us.  This will come in very handy for quick casseroles, etc.

Canned Tomato Soup (Wheat Free ~ Gluten Free)
12 lbs ripe tomatoes
6 onions
1 bunch parsley
1 head celery
2-4 bay leaves
8 whole cloves
1 red pepper
1 green pepper
1/2 cup white sugar
1/2 cup margarine (for lactose intolerant) or Butter
1/2 tsp cayenne pepper
3/4 cup cornstarch/ rice flour or mixture of both

Place first 8 ingredients in a large pot and boil for 2 hours.  Cool slightly and blend or put through a food processor.  Return to pot.  I strained some of mine with a cheese cloth, some use a sieve.  I just need to find a sieve, I think I would like it! Mix together sugar, margarine, cayenne and flour.  Add some cooled soup to make a paste.  Add slowly, while stirring to soup.  Heat, stir until thickened.  
Pour into hot sterilized jars and seal.  Hot water bath for 20 minutes or 5 lbs pressure for 10 minutes in a pressure canner.

This recipe can easily be changed to add or remove spices that you like or dislike.  Some add some carrots, basil, etc.
Carrot comparison
The above photo shows the difference between thinning carrots or leaving them crowded.  We did a bit of an experiment in the community garden this year.  The ones on the Left were thinned (planted further apart) and the others were not.  Those were the larger ones too ~ most were very tiny and cute to eat, but not that productive.  The kids at the Community Garden will now plant theirs a little further apart ~ fun lesson learned!
Pickled Dilled Carrots
 Pickled Dilled Carrots OR Beans
1 large piece of dill (head) per jar
1 bay leaf per jar
2-4 cloves of garlic per jar
4 quarts firm carrots OR beans, washed and cut, etc
 4 cups water
4 cups vinegar
8 tbsp pickling salt

Put first 3 ingredients in your sterilized jars.  Pack with clean and prepared carrots or beans.  Bring water, vinegar and salt to a full boil.  Pour into jars and seal with sterilized lids.  Hot water bath for 15-20 minutes.
This recipe is basic and you could add different spices as well.

Look whooo showed up in the garden today, my daughters little creation!

Tuesday, April 02, 2013

Mennonite Girls Can Cook Celebrations Cook Book


They've done it again!  Another great cookbook... I have their first cookbook and while you don't have to be Mennonite to enjoy these recipes, they bring back such fond memories.
I especially like the Gluten Free options and the healthier versions to all those rich creamy dishes that we grew up on.

Click through the link above and if you complete a transaction while still linked through me, I receive a small commission.  This commission goes to local adoptive families.

Thanks!

Friday, July 27, 2012

Gluten Free Cranberry Oat Loaf Bread

I once made this bread for the local Fair and took home 1st prize of lots of honey!  It is moist and delicious and now that we strive to be more gluten free, I adapted it to gluten free.

GF Cranberry Oat Loaf Bread

3/4 cup honey
1/3 cup oil
2 eggs
1/2 cup milk (could actually omit this for dairy free)
2 1/2 cups flour (GF store bought mix, or a mixture of rice flours, etc worked for me.  I didn't get fancy with it)
1 cup quick-cooking oats
1 tsp baking soda
1 tsp baking powder
1/2 tsp salt
1/2 tsp cinnamon
2 cups fresh or frozen cranberries
1 cup chopped nuts (also optional, but really make this bread great)

Combine honey, oil, eggs and milk in large bowl and mix well.
Combine dry ingredients in another bowl and then add to the wet ingredients.
Fold in the cranberries and nuts.
Spoon into 2 greased loaf pans and bake at 350F for 50+ minutes.
Cool in pans for about 15 minutes and remove to eat!

*** This loaf is very moist, so that's why nuts are a nice addition, you could probably reduce some of the honey as well.


Sunday, June 03, 2012

Dandelion Syrup Recipes

Ok, so I've been playing around with the idea of using dandelions as food... I'm going to buy some organic lemons and make a dandelion lemonade as well.

Now, I've made 2 batches of dandelion syrup (as in pancake type syrup).  I think the 2nd batch turned out a little better than my first try.  I blogged about that on my other blog, click HERE  for that.

My syrup is a typical pancake syrup consistency, not a corn syrup one.  It is very nice in tea or on plain yogurt.

The 2nd time I basically twisted the yellow bloom part off the dandelion and had very little green in it.  Put 8 cups of water over it, boiled for a few minutes, then let sit overnight.  Strained, simmered it for a long time after adding 2 cups of brown sugar.  It is very very sweet to our taste buds.  I put it in hot sterilized jars and it did seal, but it is in our fridge and I'm trying to use it up as I'm not sure how long it would last.
Next thing to try is just putting some of the bloom pieces into corn muffins from a previous post.

Thursday, May 24, 2012

Gluten Free Corn Muffins Recipe

Found a new favorite muffin... great with sweets like jam and also good for ham and pickles!


Found a nice website called Gluten Free on a Shoestring  Muffin Recipe Here

Tuesday, April 03, 2012

Gluten Free Gingerbread Cookies

Gluten-Free Gingerbread Cookies
Makes: About 2 dozen 3-inch cookies
Ingredients:
1/2 cup non-hydrogenated shortening
1/2 cup sugar
1/2 teaspoon xanthan gum
1/8 teaspoon guar gum
2 egg yolks
1/4 teaspoon pure vanilla extract
1/3 cup blackstrap molasses
1 1/2 cups gluten-free flour mix
1/2 cup + 2 tablespoons sweet rice flour
1 teaspoon baking soda
1 teaspoon cinnamon
1/2 teaspoon ground ginger
1/2 teaspoon ground cloves
1/4 teaspoon allspice
1/2 teaspoon salt
Icing and sprinkles for decorating

Recipe method:

1. With a stand mixer or electric hand beater, beat shortening, sugar, xanthan gum, and guar gum until well mixed. Add in egg yolks and beat for 1 minute, then add vanilla and molasses and mix until well incorporated.
2. Add gluten-free flour mix, sweet rice flour, baking soda, cinnamon, ginger, cloves, allspice, and salt. Beat until you've got a smooth dough. Roll dough out between two pieces of parchment until it is 1/2-inch thick and refrigerate for 1 hour.
3. Remove dough from fridge and cut with cookie cutters. Remove the excess dough from between the shapes and cut the parchment around the cookies with a pair of scissors. Gently move the cookies with their attached parchment to a cookie sheet and place the baking sheet in the refrigerator to keep the cookies chilled. Repeat until you've used up all the dough.
4. Once all the dough has been cut with cookie cutters and the shapes are arranged on a baking sheet, place the baking sheets in the refrigerator for 30 minutes. Preheat the oven to 350° while they are chilling.
5. Bake cookies for 7 minutes. Remove from oven and allow to cool on pan for 5 minutes before moving the cookies, with their attached piece of parchment, to a cooling rack. Allow to cool fully before decorating.
6. Decorate cookies by piping with your favorite decorating icing and then sprinkling with colorful sprinkles. The sky's the limit!

Monday, April 02, 2012

Gluten Free Fruit Crisp Recipe ~ Apple, Rhubarb, Peach...

I love this recipe I have been using from my dear friend in Manitoba.  Now what to do about gluten free?  Well, it only had 1 cup flour in it, so I substituted 1/2 cup corn FLOUR and 1/2 cup brown rice flour.  Delicious!

Apple or Rhubarb Crisp

4 1/2 -5 cups chopped fruit ( I have used ANY fruit I have on hand, frozen or not)
1/2 tsp cinnamon
2 tbsp water (omit if fruit was frozen)
1/2 cup sugar (try honey too!)
1/4 tsp ginger
Combine all the above in mixing bowl.
In another bowl,
melt
1/2 cup butter/marg
1 cup brown sugar
Stir
Add:
1 cup other gluten free flour (either a mix, or 1/2 cup corn flour and 1/2 cup brown rice flour as I tried)  UPDATE:  We like a blend of coconut flour/arrowroot flour better.  It is more expensive though.  Any other GF flour mix works, but I have actually reduced this to 3/4 cup.
AND 2 Cups Rolled Oats.

Put fruit in pan, pour crumb mixture on top.
Bake 350F for approx 45 minutes.

This recipe has never failed me ~ the secret may be in melting the butter and brown sugar together first.

Saturday, March 24, 2012

Alfalfa Sprouts ~ My 1st attempt ~

I used a little plastic box with tiny holes in the bottom, a lid, and a divider.  It is called Sprout Master and I don't have the bottom piece, so I put it into a Tupperware container as it sat on the counter.
With no instructions on "how to sprout"... I just took 2 even tablespoons of alfalfa seeds and sprinkled them into the sprouter.  I ran water over them, put the lid on, sat in down in the Tupperware container and left it on the counter.


It looked like this the first day


Hard to photograph, they started showing little bits of white

Ok, now the alfalfa looked like it was growing worms...
 I looked at it in the morning and evening and if it was looking "dry", I ran some water over it and then put it back in the container.  Some seeds fell through the holes, so I poured them back in.
 A few days later they are really starting to show some promise.
 Here I'm wondering if we should be eating them... but we leave them another day...

This is within 1 week and they are PACKED in there!
They tasted great!  They were packed tightly so I guess I don't need a full 2 tbsp full of seeds.  We ate a bunch and had them sitting on the table to munch on.  Then we forgot and didn't put them in the fridge... so some were starting to grow some other white fuzzy stuff (yuck) so we gave them to the chickens and they did NOT mind it at all.

Thrifty note:  I paid $13.30 for 1 kg of seeds.  I used 2 tbsp of that to make what looks like 4 of those little containers in the store.  Here they sell for $2-$4 per container.  So by sprouting my own 2 times, the seeds have more than paid for themselves!

Now, that said, I just read somewhere that they are not good for you... anyone else hear this?  I realize that the more books I read, the more I won't know what is true and what is false... but... just wondering...

Tuesday, February 21, 2012

Curried Butternut Squash Soup Recipe

I received this recipe from my Mom in law after she made it for my hubby and he called it a WINNER!
Here is the official recipe, but of course I did some variations and will say those at the end.
CURRIED BUTTERNUT SQUASH SOUP

3 tbsp butter/olive oil
2.5 lb butternut squash, peeled and diced ( I didn't weigh mine)
2 stalks celery, diced
2 carrots, peeled and diced
1 med. onion, chopped
2 apples, peeled, cored and chopped
1 red pepper, cored and chopped
3 tbsp brown sugar (i used 1 tbsp)
1/2 tsp black pepper
1 tbsp curry powder
8 cups chicken broth
Roux~ 2 tbsp melted butter, 3 tbsp oil with 4 tbsp of flour to make a paste ( I omitted)
1 egg yolk ( I omitted)
1/2 cup whipping cream  ( I put in about 1 cup of milk because it was thick)

In large stock pot, heat butter and saute all the veggies for about 10 mins.  Add seasonings. Cook another 5 minutes.  Add chicken stock and bring to a boil.  Simmer until veggies are tender, about 20 mins.
Use a blender to puree the soup in batches. Return to pot and heat.  Add the Roux if you are going to.
Whisk together egg yolk and whipping cream and add a little bit at a time to the soup to prevent the yolk from cooking.

I had already cooked my squash in the crockpot.  So I just scooped it out later and added it to a bunch of veggies ( I cooked about 5 potatoes with mine) after I had put them through the blender.  
If it is too thick, add some more water or a little milk.  Mine was a bit sweet, but I think my potatoes were a bit sweet.
It was a nice change from the regular veggie soups :)  I put a little cheese and parsley on it for the photo.

Thursday, November 24, 2011

Pumpkin Scones AKA "Auntie Angie's Scones"

Pumpkin Scones with Spiced Glaze


Pumpkin Scones with Spiced Glaze
Yield: 12 scones

For the Scones:
2 cups all-purpose flour
7 Tablespoons granulated sugar
1 Tablespoon baking powder
½ teaspoon salt
½ teaspoon ground cinnamon
½ teaspoon ground nutmeg
¼ teaspoon ground cloves
¼ teaspoon ground ginger
6 Tablespoons cold butter
½ cup canned pumpkin
3 Tablespoons half-and-half
1 large egg

For the Powdered Sugar Glaze:
1 cup plus 1 Tablespoon powdered sugar
2 Tablespoons milk

For the Spiced Glaze:
1 cup plus 3 Tablespoons powdered sugar
2 Tablespoons milk
¼ teaspoon ground cinnamon
1/8 teaspoon ground nutmeg
1 pinch ground ginger
1 pinch ground cloves

1. Preheat the oven to 425 degrees F. Line a baking sheet with parchment paper; set aside.

2. Combine flour, sugar, baking powder, salt, cinnamon, nutmeg, cloves and ginger in a large bowl. Use a fork to cut the butter into the dry ingredients until mixture is crumbly and no chunks of butter are obvious; set aside.

3. In a separate bowl, whisk together the pumpkin, half-and-half and egg. Fold wet ingredients into dry ingredients, and form the dough into a ball. Pat out dough onto a lightly floured surface and form it into a 1-inch thick rectangle about 3 times as long as wide. Use a large knife or a pizza cutter to slice the dough twice through the width, making three equal portions. Cut each of the portions in an X pattern (four pieces) so you end up with 12 triangular slices of dough. Place on prepared baking sheet. Bake for 14-16 minutes, or until light brown. Place on wire rack to cool.

4. To make the powdered sugar glaze, mix the powdered sugar and milk together until smooth. When scones are cool, use a brush to spread plain glaze over the top of each scone.

5. To make the spiced glaze, while the powdered sugar glaze is firming, combine all of the ingredients for the spiced glaze. Drizzle over each scone and allow the icing to dry before serving (about an hour). Jo ~ I just put a little cinnamon in the glaze and left it.  Still very yummy.  Girls want me to make these at Christmas!

I took this recipe from
 here.
This recipe comes from my sis in law's blog and she has much better photos of them.  I will ask her permission to link and you can drool over the scones on her blog :)
She agreed so here is Angie's Blog  Hope this works :)

Thursday, November 10, 2011

Peanut Pepper Stir Fry


Sometimes a little kitchen experiment pays off well!  I was looking through the cupboard and fridge, doing the ole' "what to make for supper" routine.  I didn't want to use meat.  So, well maybe some beans.  I didn't have any cooked and frozen, so ended up with a can of "mixed beans".  
We had lots of peppers from Ashcroft, so it would be nice to use those...and the purple onions too.  HUMM ... Maybe I could mix them all together in a sort of stirfry.
I started making my brown rice (as it takes awhile to cook).
Then the girls chopped up peppers.  I simply sauteed the purple onion, peppers and added the rinsed beans.  
Now, I remember in Indian cooking they put peanuts/peanut butter in some of their dishes.
SO, I stirred up some water, beef soup base, cornstarch and a few tablespoons of crunchy peanut butter.
IT WAS DELICIOUS!
The girls asked me to please make this again.  They practically licked their plates.


Monday, October 31, 2011

Homemade Sauerkraut


 Start with a nice home grown organic cabbage...remove outer leaves and rinse off any dirt.  Try not to get too much water into the inside of your cabbage.
Boiling water used to disinfect your crock.
Just like with canning, etc, always disinfect your pots/jars/crocks.

Use Kosher Salt...not your regular salt, your cabbage will get soggy!

We borrowed a nice cabbage slicer from a neighbor and Mom got to show off her muscles!  Do not cut off any digits ~ you'll need those!

The slicer 

Shredded cabbage

Adding Kosher salt
 The idea is to layer shredded cabbage and salt...pound away as you do this.
Pounding the cabbage

Notice the liquid coming up ~ that's from the cabbage
 What worked well for us was my Mom shredding the cabbage while I pounded it.  Jiggly arms and all...great fun!
Place a plate over the cabbage

Plastic wrap/bag over the top

Add something heavy to weigh down the plate.
The cabbage will rinse and fall and sometimes it may spill over!  This is ok.  Don't put your crock in a warm spot...furthest from the heat source is good.  Remove the weight for awhile if it is spilling over.
Sauerkraut Day 15
We ate some the other day on Day 15.  It was wonderful.  We will can it up in the next few days when our schedule allows.  SO YUMMY!

Sunday, October 23, 2011

Homemade Lemon Meringue Pie ~ from scratch!


When I first starting making pies, I went with the store bought package of filling and followed the directions.  It was good.  Then I switched it up by putting some fresh lemon juice in with the mix and it was Great.  Now I've realized it isn't that hard (and cheaper) to make it by scratch and it is FANTASTIC!

My Pampered Chef pie plate ~ a little deeper than normal.
It's stoneware and bakes so evenly.

Mix 1 1/2 cups white sugar, 1/4 cup cornstarch, 1/4 tsp salt. 

Pie dough waiting to be rolled out

Making sure it is larger than my pie plate

I sprinkle flour in the bottom

I roll out onto wax paper (from the cereal boxes) and then
flip it over onto my pie plate

Remove wrap and place inside the pie plate


Trim edges

I flip the edges under and press gently along the top edge

Poke fun at the crust ~ the holes help it not shrivel up to a tiny tart :)

Add 1 1/3 cups water to dry ingredients in the pot and stir

Separate your egg whites/yolks.
I used 4 baby eggs as they were smaller and boy, did they puff up!
Now it is time to zest your fresh lemon and squeeze out the juice.  You want 1/2 cup of juice.


My zester my hubby bought me in August 2003.
How do I remember when he bought me that?  I was hugely pregnant with our 3rd daughter and my hubby was working 3 hours away.  He was a student and we needed to make some money in the summer. It was hot hot hot.  I had no air conditioning and lived upstairs.  I was miserable.  He bought me a zester ~ he knows me so well!
Heat up your water/sugar mix and stir stir stir

Beat your egg yolks.  Slowly add some cooked filling mix to the yolks.
If you were to just add the yolks to the hot mixture, you'd have LUMPS of cooked egg yolk ~ Gross!  Slowly add warm mixture first, then add it.  VOILA! No lumps.
Cooking your pie crust ... and yes, it shrinks a little.

When your filling looks cooked, add 2 tbsp butter and your 1/2 cup lemon juice.


Then add your zest ~ but first remove your wisk!
It gets all tangled around it otherwise.  Switch to a spatula!

Stir it up with your spatula...smells wonderful!

Cooked pie crust
Now to meringue ~ I was so scared of meringue ~ it's just whipped egg whites and sugar really.  The fresher your egg, the better.  Well, mine were very fresh and from young hens.  I used 4 little eggs and 1/4 cup white sugar and 1/4 tsp cream of tartar.  If you don't have cream of tartar, no worries!  It still turns out fine!
1/4 cup white sugar, 1/4 tsp cream of tartar and 4 little egg whites

Starting to whip the meringue ~
Slowly add 1/4 cup white sugar and 1/4 tsp cream of tartar

Whipped egg white ~ white and forms stiff peeks when you lift your beater out

Filling up the cooked pie crust.  Next time I will either make more
filling, or use a smaller pie plate.

The cook needs to take a quick lick to make sure it
doesn't taste horrid or anything...then wash your spatula of course


Try to make some nice swirls and peeks in it

 Almost perfect ~ Lesson Learned:  Don't go to the freezer to "get something quick", as something will fall and you'll get distracted and  a few minutes later your pie will look like this~
Lemon Meringue Pie ~ Did not taste burnt at all, just a little browned on top
I think it took about 10 minutes at 375F.  This is something you watch and not leave unattended :)
Pie was very much enjoyed!
Lemon Meringue Pie
1 1/2 cups white sugar
1/4 cup cornstarch
1/4 tsp salt
1 1/3 cup water
3 eggs, separated ~ yolks beaten
2 tbsp butter
1/2 cup lemon juice
1 tsp lemon peel (or slightly more)
1 tsp lemon extract (which I never have)
BAKED pie crust 9in.
Meringue:
3 egg whites
1/4 tsp cream of tartar
1/4 cup white sugar